4:19 PM

Chicken Cordon Bleu

I was looking through my April issue of Readers Digest and found this recipe and knew right away that I was going to try it.  It looked so yummy and didn't seem so hard to make.  It didn't hurt that it sounded impressive so when I was eventually asked "What's for dinner Mom?" I could say " why, chicken cordon blue, of course!"
 I adapted a couple of things that worked out good for me.  Besides doubling the original recipe which only was to make 4 servings, I changed the sauce a bit too.  I used a whole 12 ounce can of evaporated milk instead of 1 cup (mainly because I couldn't see throwing any of it away), and I used the tops of green onions instead of chives because that is what I had on hand.  I also used my whole 6 ounce package of swiss cheese because the recipe called for shredded Swiss and mine was in slices so I just guessed and it turned out just fine.  I also used the whole egg to dip the chicken in instead of just the egg whites because I only had 2 eggs left and the recipe called for 4 egg whites!  I discovered that I have enough sauce left over to make another 12 pieces of chicken or to use in another way (perhaps in some rice), because I only used half of what the recipe called for in each piece of chicken.  By the way, each piece of chicken only has about 300 calories!

So here is what I used: 1 12 ounce can evaporated milk, 4 teaspoons cornstarch, 6 ounce package of Swiss cheese, tops of 3 green onion, salt and pepper to taste,  8 chicken cutlets pounded very thin, 1/3 cup whole wheat flour, 1 1/2 cups panko bread crumbs, 2 beaten eggs.

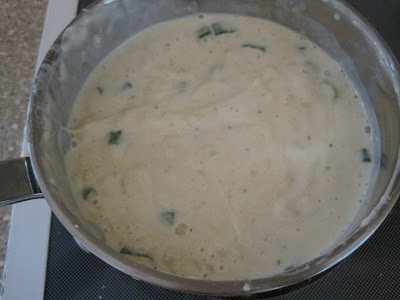
In a small saucepan, whisk 12 ounce can of evaporated milk into 4 teaspoons of cornstarch.


Bring milk mixture to boil over high heat, whisking constantly.  Reduce heat to low and continue to cook until mixture has thickened, about 1 minute.  Then whisk cheese into sauce until melted and smooth.  Whisk in green onion and salt and pepper to taste.


Spray ice cube tray with cooking spray and divide cheese sauce equally.  I had enough to fill 26 cubes.  Freeze sauce until hard, about 2 hours.


Preheat oven to 450 degrees.  Line a cookie sheet with parchment paper or spray with cooking spray.  Set aside.  Lay chicken on work surface and season with salt and pepper to taste. (Make sure the chicken is pounded out first.)


Arrange ham slices over chicken.


Remove frozen cheese sauce cubes from trays and place a cube in the center of each piece of chicken.


Roll up chicken to encase filling, and secure each package with 2-3 toothpicks.  The original recipe called for 2 cubes on each piece of chicken, but I couldn't get it rolled up if I used two. Dip the chicken first in the flour, then in the egg, and then in the panko bread crumbs.


Arrange on the prepared cookie sheet and spray chicken with cooking spray.  Bake for 25- 30 minutes.


Serve hot and enjoy!  I served mine with rice and salad.  In the future I would take some of my reserved sauce and mix it in with the rice.  I was pleasantly surprised at how well the cheese mixture stayed inside the chicken.

5:22 PM

Chicken Parmesan

I hadn't made this in a long time and then we had some company and my daughter has been asking for it again ever since.  When I made it for my company I thought that I had some of my own canned sauce, but discovered that I had run out and had to use some store bought that I had on hand in case of an emergency. Not that I would be able to give out our family pasta sauce recipe, but now I can safely tell you how I made a chicken parmesan that my family really enjoyed, even if it was made with store bought sauce.  I wonder if the older generation Italians in my family would would have used store bought pasta sauce but nevertheless I did and we all enjoyed it!

My measurements are a bit of guess work, but this is what I have come up with to feed 6 people: 1 can of pasta sauce (I used Prego- it's what I had a coupon for!), approximately 1 1/2 cups mozzarella cheese,  6-8 chicken breasts, 1 1/2 cup of Italian bread crumbs, 1/2 cup parmesan cheese, 1 egg, 1/2 cup buttermilk, oil for browning.

Mix together the egg and buttermilk and put the chicken in it.  I sliced the thicker pieces of chicken in half to get more pieces and to speed up the cooking time.


Next, mix together the bread crumbs and cheese and coat the chicken breasts in it, one at a time.
Set the coated chicken breasts to the side while you get all of them coated.


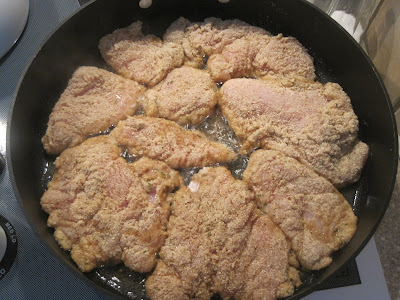
Heat the oil in a large pan over medium high heat and lay your coated chicken breasts in the pan.  I had a few pieces that didn't fit into the pan and I had to do when these were done.


Coat a 9 X 11 pan (or larger- I used a lasagna pan) with a small amount of sauce, just enough to cover the bottom of the pan.


When your chicken is browned on both sides, place in the pan on top of the sauce.  Drizzle more sauce on top of the chicken.  It is all to your taste, but I used about 1/2 the jar all together.  Sprinkle the mozzarella cheese on top and put into a preheated 350 degree oven for 30-40 minutes- or until chicken is done.


I served mine with boiled red skinned potatoes, tossed salad, and homemade bread.  I hope you enjoy what's for dinner!

6:08 PM

How am I Growing?

This is a picture of a tree that I pass by almost every day.  It always gets my attention because of how it is growing.  It's obviously not exactly straight.  In fact, you cannot tell from this picture, but the roots are bulging out of the ground.  My guess is it had some pretty rough days at the beginning but it seems to be headed in the right direction now.  Just about every time I pass it I can't help but think of my own Christian walk.  Unlike the tree, I had a wonderful start.  I couldn't ask for a better foundation to build my Christian walk.  But I am like every other sinner out there who messes up.  I have days my life is not pointing toward heaven and my strong Christian roots start bulging out of the ground.  There are days when I am simply a little "off".  I get away from having good long prayer time.  I neglect my bible study.  I procrastinate in doing good.  The list could go on and on.  I am so thankful that God forgives me and continues to love me despite my leaning!

Thank you Father for being there to straighten me out.  Thank you for Your words in Psalm 23:6 that says "Surely goodness and lovingkindness will follow me all the days of my life and I will dwell in the house of the Lord forever." You are an awesome God!  Amen.

7:12 PM

Tangy Ranch Chicken

Thank goodness for couponing! If it wasn't for clipping coupons I would have never tried this recipe.  Actually, if it weren't for my friend clipping coupons and telling me she found this one, I would have skipped over it when I did my coupons.  So here is the order of events:  Kathy tried it out on her family, they loved it.  I tried it out on my family, they loved it. Now you can try it out on your family (you get the idea).  So here are the list of ingredients:  2/3 cup Ranch dressing, 1/3 cup classic yellow mustard, 3 tablespoons brown sugar, and 4-6 bonless skinless chicken breasts.


Mix the Ranch dressing, mustard, and brown sugar together.

Heat 1 tablespoon oil in nonstick skillet.  Saute chicken until browned, about 10 minutes.  I used two pans to be able to fit all my chicken breasts .  There is actually enough sauce to cover about 10 breasts.

After the chicken is browned, glaze the chicken with the sauce.  Turn the chicken to coat both sides.  Let  simmer on medium heat until the chicken is done.  Mine took about another 10-15 minutes.


Enjoy! I served my chicken with rice and a garden salad.  We didn't have any leftovers and everyone asked me to make it again.  Let me know how your family likes it.


3:01 PM

Baked Doughnuts! (this one's for you Elizabeth)

I was looking through my Family Circle magazine and came across this recipe.  I immediately thought of Elizabeth, my youngest follower.  At age 12 she is already fearless in the kitchen.  I admire her adventurous spirit.
 I did not have the doughnut pan that the recipe called for, but my sister let me borrow her mini bundt cake pan.  That worked out pretty good.  They taste more like cake than a doughnut but they are yummy none the less! I made a batch of chocolate ones just to see how they would turn out and then decided to make vanilla ones for this post.  I had run out of brown sugar after the first batch so I had to make my own for the second.  That is why in the picture the brown sugar looks a little odd.  (The way to make brown sugar is 1 cup of white sugar combined with 1/2 cup of molasses yields 1 cup of brown sugar).  I should also mention in my first batch I used regular white flour, but in my second batch I used cake flour.  I needed to add an extra 1/4 cup of cake flour to have the batter thick enough.   Also, I forgot to include the egg in the picture of ingredients, so don't forget to add it!

Here is what you need for vanilla doughnuts:  1 1/4 cup of flour, 1/2 teaspoon baking soda, 1/4 teaspoon salt, 1/2 cup buttermilk, 1/3 cup packed dark-brown sugar, 1 egg, 4 teaspoons unsalted butter, melted, 1 teaspoon vanilla extract. (Note: For chocolate doughnuts, decrease flour to 1 cup,  add 1/4 cup of cocoa, and increase brown sugar to 1/2 cup)


This is the pan I used.  If you have a doughnut pan on hand, you most likely already know how to do this!

Heat oven to 325.  Coat your pan with nonstick cooking spray.  In a large bowl, whisk flour, baking soda and salt.  In a small bowl, whisk buttermilk, sugar, egg, melted butter and vanilla extract until smooth.  Add milk mixture to flour mixture; whisk until smooth. Note: My butter was not completely melted, that is why it looks a little funny!


Spoon batter into a large resealable plastic bag.  Cut off a corner and squeeze batter into prepared pan, about 2/3 full.  Or simply spoon into the pan and smooth the tops of each.  Bake at 325 for 15 minutes if you are using the bundt pan, or 13 minutes if you are using a doughnut pan.  They should spring back when lightly pressed.


Let cool in the pan on a rack for 3 minutes, then carefully turn out onto rack to cool.  After they are completely cooled, you are ready to decorate!  I used 1 cup of powdered sugar mixed with 2 tablespoons of milk (and 1 tablespoon of cocoa for the chocolate topping).  In addition I sprinkled some mini chocolate chips on top.  The doughnut itself is not very sweet, so don't be afraid the topping is going to be too much.  If you try this, let me know some of your creations for the toppings.

6:39 AM

Don't Come

Those are the words I told my 3 year old before I laid him down to bed last night, "Don't come."  I said it because for the last couple of weeks he has been showing up in my bed and often times I am too tired to carry him back to his room.  My lack of sleep has been increasing due to the grinding of teeth, snoring, and legs in my back from this little person.  My husband had told him a while back that if he is sick or scared he can come and sleep with us, so he has been saying he is scared and it softens our hearts enough to lift him up onto our bed, but leaving us very tired the following day.  So last night I decided to lay down the new rules.  Basiclly my lines went something like this:  "This is your bed, stay in it no matter what!"  "Do not come into my room until you see the light coming in your window." "I don't want to see you until the morning!"

So 4:30 am rolls around and my husband leaps out of bed to find him curled up in the corner of his bed coughing and crying.  He was sick and scared!  He had a bad dream and a bad cough and I had given him bad instructions of what to do.  He was crying out for me and I hadn't even heard him, my husband thankfully did.  "I want Mommy!" was what he was requesting and I did come once I heard it, but I felt awful when it sank in what he had been going through all alone.  Maybe my tiredness is making me extra emotional, but my mind immediately went to the words of Matthew 11:28-30 "Come to me all you who are weary and heavy burdened, and I will give you rest. Take my yoke upon you and learn from me, for I am gentle and humble in heart, and you will find rest for your souls.  For my yoke is easy and my burden is light."

The good news is that Jesus never gives bad instructions.  He would never say don't come to me.  Quite the opposite is true.  There is never a time when he doesn't want us to come and be with Him.  He never slumbers or sleeps.  We are never disturbing him.  He doesn't have "Come to Me" hours.  He welcomes us 24/7!  I know I need to figure this whole thing out with my son coming into my bed- there has to be a healthy balance somewhere.  But today I want it to sink in that Jesus always wants me to come to Him, whatever the circumstances are!

9:48 PM

Breakfast Bagel Sticks

Earlier this month I showed you how to make bagels.  I suggest reading through that post before beginning this one.  I am lacking a few pictures at the boiling stage and it would be helpful to see that.  Since then I have experimented a little and have come up with a good tasting, filling, breakfast type bagel.  What you will need for the dough is the following:  1 cup whole wheat flour, 2 cups white flour (I use high gluten bread flour), 1 1/8 cup water,  1 cup combined nuts and dried fruit, 1/2 tablespoon oil, 1 tablespoon honey, 1/2 tablespoon salt, 1 tablespoon instant dry yeast.


Combine all ingredients in a standing mixer (not necessary, but very helpful) with your bread hook attachment and knead for 8 minutes.


After 8 minutes the dough should be very stiff and not sticky.  Add a small amount of flour if it is not stiff and too sticky to handle and continue to knead if necessary.  Take the dough out and put into an oiled bowl and cover with plastic wrap.  Keep in a draft free place to rise for 1 hour or until double in size.


Gently roll the dough out onto your counter.  Divide the dough into eight pieces for large bagel sticks, or 16 for smaller ones.  You can also make into bagel shapes if you would like.  Now you just follow the directions for regular bagels.


Let rise for 20 minutes.  While the dough is rising, preheat your oven to 375,  bring 6-8 cups of water with 2 tablespoons of sugar and 5 teaspoons of baking soda to a boil, and grease a baking sheet.  Gently drop 2-3 pieces of dough into the water at a time.  Boil for 1 minute and using a slotted spoon remove the sticks and place on an oiled baking sheet.  Brush each stick with a beaten egg.  When your tray is filled, place in the oven and bake for 20 minutes.


Enjoy!  I have found freezing a bunch of these and then pulling them out the night before makes for an easy take along breakfast.  Next time I think I am going to add a little protein powder to the dough to give it a little extra nutrition.  Let me know the things you come up with.

8:09 AM

Indoor Gardening

"Happy are those who respect the Lord and obey him.  You will enjoy what you work for, and you will be blessed with good things." -Psalm 128:1-2

We are trying to start an indoor garden again this year.  I say again because we have tried it numerous times in the past and it has never worked.  This time we have higher hopes because we had an expert helping us. Harold is our neighbor who is also a horticulturalist.  Harold is just a phone call away when we have any questions.  He was right by our side showing us exactly how to do it.  What makes it even better is that it makes him happy to teach us.  We are anticipating success this year.  Once we got expert advice we can see that the things we were doing in the past were not what the plants needed.  It took going to the right source to do it the right way.

It is the same with growing spiritually.  If you are seeking to grow spiritually and turning anywhere other than the Bible and praying to the One True God, you will not grow.  Anything short of asking Jesus for help is not going to work, no matter how many times you try or how good your intentions are.  A life with Christ brings hope, peace and comfort through all the seasons of your life.

I need to go water my plants now.  The sturdy sprouts are peeking through the soil and it brings a smile to my face!

12:09 PM

Bagels

Does the thought of a nice warm bagel sound good to you?  Now you can make them yourself and have them on hand for whenever the urge arises to bite into a soft chewy bagel.  My family loves them, so much so that we buy cream cheese in bulk!  I hope you enjoy them.  I will be using this recipe in future posts to show how to make bagel dogs and other tasty treats with this dough.

What you to make the dough for 8 large bagels, or 16 smaller bagels, is the following: 3 1/2 cups white bread flour (I use Gordon's high gluten flour), 1/2 tablespoon salt, 1 tablespoon yeast (I use instant dry yeast that I purchase at Gordon's), 1 tablespoon sugar, 1/2 tablespoon oil, 1 1/8 cup warm water, and a standing mixer.


Combine all the ingredients in the mixer bowl.  Use your bread hook attachment. Knead the dough for 8 minutes on the 2 or 3 setting (for a Kitchen Aid mixer)

 This is a very stiff dough that requires a long knead time

After the 8 minutes, the dough should look like this:

Take the dough out and form into a ball.  Place it into an oiled bowl and cover with plastic wrap.

Let is rise for 1 hour or until it has doubled in size.

Gently turn the dough out onto your counter and cut into either 8 or 16 pieces.  I choose to make 8 large bagels.

Gently work the slice into a ball.  Be careful not to squish it too much as it will take longer to rise the second time.  Poke a hole in the middle and stretch it out a bit.


Set the dough out to rise again on your counter for 20-25 minutes.

Using a large pot, boil 6-8 cups of water with 5 teaspoons of baking soda and 2 tablespoons of sugar.  Reduce the heat to low and boil 2 to 3 bagels at a time for 1 minute.  It is very important not to over boil them or they will get soggy.  At this point you should start preheating your oven to 375 degrees.


Use a slotted spoon to remove the bagels from the water.  Place on a well oiled cookie sheet. Brush them with egg.


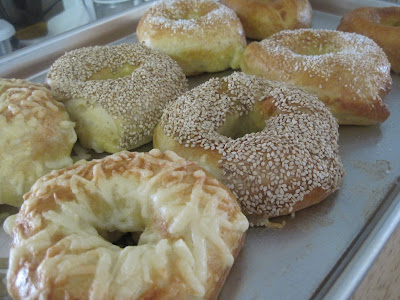
Leave them plain or top with your favorite topping.  I made 2 Asiago cheese, 2 sesame seed, 2 kosher salt and 2 plain.

Bake in a preheated 375 degree oven for 20 minutes or until golden brown.


Remove from cookie sheet and cool.  These bagels do not have a very long shelf life.  I highly suggest freezing any bagels you don't plan on eating in a day.  They are still delicious after you defrost them.  I freeze mine in a ziplock bag and it works just fine.  It's so nice to have a fresh tasting bagel any time I want.