4:55 PM

Crispy Orange Chicken

Applebee's Crispy Orange Chicken Bowl
adapted from
  America's Most Wanted Recipes by Ron Douglas


Let me just start out by saying that this recipe was sooooo good.  Everyone agreed around the table that it was a "do over".  A "do over" title given to a meal in my household means they want me to make it again.  I will have to make it again and then post the pictures because I lost my camera.  I took this shot after I found it at lunch the next day with a plate of the leftovers.    Don't ask me how it ended up downstairs by the copier, but it did.  Needless to say I couldn't do the step by step instructions with photos.

The other thing about this recipe you should know is that unless you have a few of the things prepared ahead of time, it can be a little time consuming.  I highly recommend making the orange glaze and having it on hand.  It was very tasty and would be great to put on other breaded chicken recipes.  You could also have the almond-rice pilaf done beforehand.  There are 4 parts to making crispy orange chicken.

Part 1  Orange Glaze

1/4 teaspoon minced garlic
1 tablespoon vegetable oil
1/4 cup slivered almonds
1 cup orange juice
1/2 cup packed light brown sugar
3 tablespoons orange marmalade (I used apricot)
2 tablespoons soy sauce
1/2 teaspoon parsley
1/4 teaspoon red pepper
1 tablespoon rice wine vinegar

To make:  Lightly saute the minced garlic in the vegetable oil-don't let the garlic burn, or it will taste bitter. Add all the remaining ingredients and bring the mixture to a boil; then reduce the heat and simmer until the sauce has thickened to a glaze consistency, 12-15 minutes.  It can be reheated if necessary.

Part 2  Almond-Rice Pilaf


3 tablespoons butter
1/4 cup diced onion
1/4 cup diced celery
1 cup uncooked rice
2 1/4 cups chicken broth
pinch salt
1 teaspoon parsley
1/4 cup slivered almonds, plus extra for garnish

To make:  Heat the butter and lightly saute the onion and celery until tender, but not browned.  Add the rice and stir until all the grains are coated with the butter and have turned opaque.  Add the chicken broth, salt, and parsley and bring to a boil, then cover tightly and reduce the heat to low.  Cook the rice until all the broth has been absorbed, 12-15 minutes.  Stir in the almonds while fluffing the pilaf with a fork.  The rice can be reheated if necessary.

Part 3  Vegetables


1 bag of frozen Asian-style vegetables OR
1 1/2 cups broccoli florets
1 cup sliced red bell pepper
3/4 cup sugar snap or snow peas
1/4 cup shredded carrot
*note, I only had snow peas and carrots on hand

To make:  Steam the vegetables in a steamer basket on the stovetop or in a microwave.  To save some time, you can use a bag of frozen Asian-style vegetables, available at the supermarket.

Part 4  Chicken


1 beaten egg
1/2 teaspoon salt
1/4 teaspoon pepper
1 tablespoon vegetable oil, plus extra for frying
2 punds boneless, skinless chicken breasts, cut into 2-inch pieces
1/2 cup plus 1 tablespoon cornstarch
1/4 cup all purpose flour

To make:  Whisk the egg with the salt, black pepper, and the 1 tablespoon vegetable oil and add the chicken pieces.  In a separate bowl, combine the cornstarch and flour, mixing well.  Add the chicken pieces a couple at a time and coat them thoroughly with the cornstarch mixture, then set them side by side on a baking sheet.  Finish the whole batch this way.  Fry the coated chicken pieces in vegetable oil until they are light golden brown, 3 to 4 minutes- do not overcook, or the chicken will be tough.  Remove the pieces with a slotted spoon to drain on paper towels.

Topping


1/2 cup crispy chow mein noodles

To put it all together, top the chicken on top of the rice and serve the vegetables on the side.


3:48 PM

Vanilla Dessert Sandwiches

Adapted from Alice Medrich's Vanilla Dessert Sandwiches

Better Homes and Gardens is growing to be my favorite magazine, second only to Runners World. With Runners World there is always a workout or running tip I cannot wait to get my running gear on for. With Better Homes and Gardens there is always a recipe I cannot wait to fire up my oven for.  I guess it is good that I enjoy both, or I may be in trouble! This vanilla sandwich cookie is so delicious you will not be disappointed in the effort.  I made some minor changes from the original due to the lack of certain ingredients, but I do not think the taste was compromised at all.

This is what you need:

3 cups unbleached all-purpose flour
2 tsp. cream of tartar
1 tsp. baking soda
1/2 tsp salt
1 cup butter, softened (I used salted butter, the recipe called for unsalted)
2 Tbsp.
1 Tbsp. vanilla extract
1 tsp pure ground vanilla beans or 2 tsp vanilla extract (I obviously went for the vanilla extract!)
Sugar for sprinkling on top of the cookie (the recipe called for vanilla sugar)
Your favorite frosting for spreading between the sandwiches


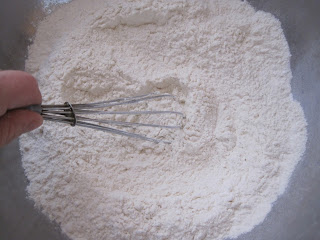
In medium bowl whisk together 3 cups flour, 2 tsp. cream of tartar, 1 tsp baking soda, 1/2 tsp salt.  Set aside.


In large bowl beat 1 cup butter with an electric mixer on medium speed for 30 seconds.  Add 1 1/2 cups granulated sugar and beat until smooth and creamy.  Beat in 2 Tbsp milk and 1 Tbsp + 2 tsp vanilla.  Beat in as much of the flour mixture as you can with the mixer.  At this point the recipe said to add the remainder by hand and the dough should be soft.  However, I added the whole flour mixture to the mixer and the dough was stiff, very stiff.  Then it said to refrigerate the dough for about 30 minutes or until it is easy to handle.  I didn't chill it because I didn't need it to be any firmer than it was.  I'm not sure why mine was so stiff,  but the end results were good.

Divide the dough in quarters, or halves, whichever is easier for you to roll out.


Preheat oven to 350.


Between pieces of wax paper, plastic wrap or on a well floured surface, roll dough out to 1/8" thickness.


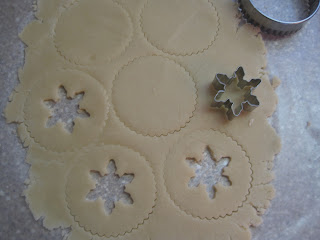
Using a 3" round cookie cutter, cut out circles from the dough.  Using a 1" cookie cutter, cut out circles from the centers of half the dough circles.  I thought I was pretty smart to use my doughnut cutter until I realized I only needed a hole in half the circles!  I just pinched the dough together on half of them.  I switched to a regular cookie cutter after that.


Place dough circles on parchment paper-lined cookie sheets.  Reroll scraps and cut out additional dough circles.  Continue with the remainder of the dough.  I used the 1" pieces to make little cookies, but if you want to get more sandwiches, reroll them too.  My son loved the little mittens and I am glad I made them.

Sprinkle the cutout circles with a pinch of sugar.


Bake cookies for 10 minutes or until golden brown.  Let cookies cool on cookie sheets for 1 minute.  Transfer cookies to wire racks to cool completely.


Spread bottoms of the solid cookies with about 1 1/2 teaspoons of frosting.  I spread the frosting on the rough side of the cookie (the bottom) Top each with one of the cookies with the center hole, sugar side up.  Refrigerate filled cookies to store.  Makes approx. 24 sandwich cookies.

Suggested frosting:

Vanilla:  Mix softened butter and powdered sugar then add a small amount of vanilla and milk until desired consistency.

Strawberry:  Mix strawberry cream cheese, powdered sugar until the desired consistency.

Chocolate:  In medium saucepan melt 6 Tbsp. unsalted butter.  Stir in 1 cup sugar, 1 cup natural unsweetened cocoa powder, and a pinch of salt.  Gradually stir in 1 cup whipping cream.  Heat, stirring constantly, until smooth and hot but not boiling.  Remove from heat; stir in 1 tsp pure vanilla extract.  Set aside; cool until thickened and spreadable.